Friday 30 January 2015

The Envelope System Of Budgeting


In this day and age everyone is talking about budgets. I hear the chatter everywhere I go, “Do you have one”, “I’m going to start one”, “what’s the best one”, “I can never follow one” and on and on. What I’ve found is that people genuinely want to find a budget that works for them and their family and stick with it. Sounds pretty easy, right?

This first time beginner’s budget system was passed onto me by my mother, shortly after I moved out on my own more than twenty years ago. She called it the "Envelope system". Whether or not is has an official name, I couldn’t tell you. The system is fantastic when you can't afford one of those expensive accounting ledgers or an accountant or financial planner to walk you through the baby steps of getting it all together.

Start by taking a clean sheet of paper and dividing it into 3 equal columns. At the top of each column, write the following: 


  1. Monthly Expenses
  2. Yearly Expenses
  3. Income Sources- This amount is your total monthly income from all sources. Write each source down, add them up and then divide them by 4.


Monthly Expenses ÷ 4
Yearly Expenses ÷ 52 weeks
Monthly Income Total
Rent $400 ÷ 4 = $100. week
Phone $60 ÷ 4 = $15. week
Utilities $100 ÷ 4 = $25. week
Groceries $200 ÷ 4 =$50 wk
Renters Ins. $350÷ 52 = $6.75 wk
Car Ins. $1200 ÷ 52 = $24. week
My Paycheck for the Month = $1200.Take your monthly income and divide by 4. This is how much you have to put towards each weeks bills.
Total Weekly Amount $190.Total Weekly Amount $30.75Total Wkly Amt $300.

Next, under each column list all the expenses that you have. 


Wednesday 28 January 2015

5 Key Tips To Saving Money


Okay so, you want to save money, you're willing to learn, it's obvious, after all, you are HERE! 
To develop a successful budget for your family, here are 5 Key Points . . .

1. Teamwork- Unless you're Single, then your spouse should be on board with the budget. You both need to have a clear understanding of what the monthly expenses are, where the money flow is headed (to the bills, to your favorite restaurant or bar every Friday night!), as well as who is responsible for physically paying the bills, (writing the checks, clicking the online bill pay, etc).

2. Put it in Writing - sit down together and make two columns on plain piece of paper. In one column, list all of your expenses, don't forget things like pet care, daycare, even magazine subscriptions. In the other column list all sources of income. 


3. Understand Your Income- this sounds relatively easy, but in my experience many folks just don't know what their income truly is. If you get paid on a weekly basis, grab your check stubs, take a look at how many deductions are being withdrawn weekly, insurance expenses, 401K (find out if your work is matching your 401K!) This is an avenue of free money that you could be missing out on. Sometimes, viewing your expenses vs your income in a percentage point of view makes a difference in your spending habits. For example, If you make $2,000 a month and you want a new truck with payments of $500 a month than 25% of your income is going to your vehicle- and that's not including insurance, excise or personal property taxes, title & registration fees.

If you are self-employed and your income is a bit dodgy, figure out how much income you average per month and use that as your guideline for your budget.

4. Prioritize-
 This is a serious Must-Do. Once you have written down all of your expenses on paper- get a clean sheet of paper and rewrite them in order of Priority. If your house is your biggest priority, put your mortgage at the top. 
Use a program, such as Quicken, to track your expenses but be sure to print out a copy of your budget once it's completed, tack it up in a place where you AND your spouse can take a look at it everyday. No, this isn't to worry you and make you wonder where you're going to get enough money to pay the bills, this is to remind you of what your expenses are, where your money Needs to go and what your goals are.

5. List your Goals- Most couples don't plan to fail, but many fail to plan. If you haven't discussed with your significant other what your goals are and you are not both in agreement of those goals, you will not reach them. On the bottom of your Budget, Write your Goals down. If your goal is to have your house paid off and be entirely debt free, write it on there. If your goal is to Retire at age 55, put it down on paper. 


If you follow these key points, you will be well on your way to creating a successful family budget.

Monday 26 January 2015

Home Made Garlic Salt


Garlic salt is one of the few seasonings that we use on a daily basis, oftentimes in place of regular salt when seasoning meals. It also happens to be one of the simplest 'do it yourself' recipes that there is! Here's how to make your own garlic salt at home. . . 
This is one of those, "I can't believe it was so simple, why didn't I think of that?" kind of recipes!

You'll Need:
1/4 c. Table Salt (whatever kind you like)
2 Tbs Garlic Powder
1/2 tsp Parsley (**Optional)

Combine the ingredients together, mixing well and then transfer it to a jar or other spice container. The parsley is entirely optional and we add it only for a touch of color to the salt.

Wednesday 21 January 2015

Start A Salad Club At Work To Create Dirt Cheap Lunches


Do you find yourself staring into the fridge at night wondering what you're going to eat for lunch at work the next day? Chances are, several of your co-workers are doing the same. If you'd like a tasty lunch that varies daily, Create a Salad Club at work, here's how it works... You'll need 5 or so coworkers willing to participate, a list of ingredients that can be rotated weekly such as:

  • Lettuce (at least different 2 types)
  • Spinach
  • Cucumbers
  • Celery
  • Carrots
  • Hard Boiled Eggs, cut into slices
  • Croutons
  • Roasted or Grilled Chicken (sliced/cubed)
  • Shredded Cheddar Cheese
  • Pickled Beets
  • Olives
  • radishes
  • Peas
  • Crumbled Bacon
  • Cottage Cheese, etc

Each member of the Salad club picks two ingredients to purchase and prepare and brings it into work on Monday. At lunchtime everyone gathers together, pulls out the prepared veggies and creates their own salad, buffet style. 

This creates delicious healthy lunches for an entire week for under $7.50 per person, per week. That's just $1.50 per day to eat a healthy lunch and keep your fitness resolutions!

(Each person is responsible for their own salad dressing).


MYO Magnet Travel Fun


MYO Magnet Fun


You'll Need the following:

2 sheets of Inkjet Magnet Sheets
Computer Printer
Decent Scissors
Clip Art/ Graphics that you enjoy
Step #1: Open any graphics or print shop type program & create a blank Page.
Step #2: Create a Table with individual squares and add a different graphic to each square, depending on what you'd like the finished product to be
Step #3: Print your magnets, cut them out and place them in an attractive box, decorated jar, or in a baggie with a topper on it.
Step #4: Stick them to the fridge or a filing cabinet and let the kids have a ball! Or, see the tip below on frugal decorating!

This makes a wonderfully, easy, educational gift for just a couple dollars!


Additional Gift Ideas:

Magnet Word Art:
using your word perfect or any text word program choose a font you like and write out as many words as you can think of to fill a page. Cut out each word individually & place them in a cute gift box. This gift is perfect for kids who are learning new vocabulary, working on sentences & punctuation. You can divide the words up into nouns, verbs, adjectives, etc. Not only is this educational, but your kids will spend hours playing with them & creating stories. Note: If creating word art, I suggest creating a table so you'll have all the same size magnets.


Create a Barn and tons of various barnyard animals, cut them out and let your child play for hours.


Magnet Dolls...


Remember paper dolls when you were a kid? I remember.. they were fun, but they ripped easily & the tabs often fell off. You can easily print your own paper-dolls, outfits, hairstyles & accessories onto magnetic sheets, cut them out for hours of creative fun.

Doll & Hair
Hair for Friends
Clothing for Friends in Various Themes


Create a Beast - Create wild shapes and colors, cut them out and place them in a decorative box, (personalize one using your computer.) Let your child create his or her own wacky magnet beast creature by stacking the different shapes on top of one another. (If they want to give them as gifts after they are created, simply use a little Elmer's glue!)

Travel Games: Print a tic-tac- toe board or Checkers Board & magnetic "game" pieces. Simple to store, easy to play in the car

Frugal Decorating Idea:

Did you know they sell Magnetic Paint at the store? Why not paint a strip in your child's room or playroom & add several homemade magnet sets to the strips. They could have word art, a barn & animals, Trucks & Cars for Racing, Dolls, Cartoon & book Characters, the possibilities are endless. With a small can of paint, you could transform a room for just a couple dollars.

Monday 19 January 2015

30 Day Squat Challenge


Don't feel like paying for a gym membership, but still want to get fit fast? 
Take this Squat Challenge! 
Can you do it?
I'm Going To Try

Wednesday 14 January 2015

BLT Stuffed Avocado's

This is not my idea, but I am so going to try, this avocado has become a extreme favourite of mine this summer,  and I wanted to share it with you all.


Instead of putting avocado on your BLT sandwich, how about putting your BLT sandwich into your avocado? Not only does that mean fewer carbs—this gorgeous appetizer, side dish, main dish, snack, lunch, however you want to enjoy it—is unbelievably delicious! Simply peel an avocado and stuff it with bacon, tomato and all of your favorite sandwich toppings!
  1. 1 Step 1
    Ingredients
    Preheat the oven to 400 degrees F and gather your ingredients.
    • 2 large avocados
    • Fresh lemon juice
    • 1 Roma tomato, seeded and cubed
    • 1 cup cubed French bread
    • 1/2 cup finely chopped spinach leaves
    • 1/4 cup cooked crumbled bacon
    • 2 tablespoons mayonnaise
    • 2 teaspoons extra virgin olive oil
    • 1/2 teaspoon salt
    • 1/4 teaspoon black pepper
    • 2 Step 2
      Prepare the Avocados
      Cut the avocados in half, remove the pits, and carefully remove the peel. Rub the outsides of each half with some fresh lemon juice. This will help them maintain their nice color. Set aside.
    • 3 Step 3
      Add Remaining Ingredients to Bowl
      In a medium mixing bowl, add all remaining ingredients.
    • 4 Step 4
      Stir to Combine
      Mix everything together.
    • 5 Step 5
      Stuff the Avocados and Bake
      Stuff the avocados with as much of the filling as you can fit, allowing the filling to come up over the sides a bit. Place the avocados on a non-stick baking sheet and bake for about 10-12 minutes, or until the filling has turned a light golden brown.
    • 6 Step 6
      Enjoy!

    Monday 12 January 2015

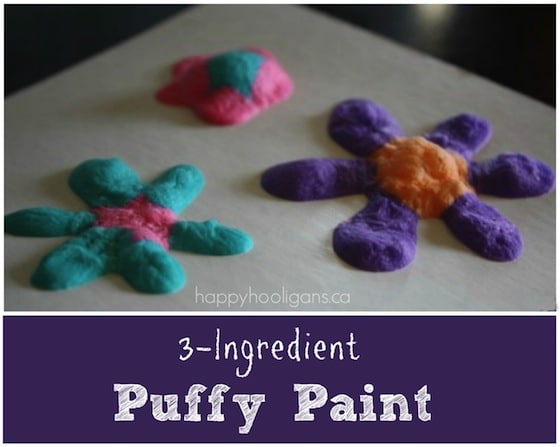
    Making Homemade Fluffy Paints- Simple Ingredients

    Make your own Puffy Paints-when it's cold outside, give the kids something easy & fun to do inside.

    This homemade puffy paint fits the bill perfectly! This paint is super-easy and inexpensive to make. It’s fun to create with, but the best part is watching your artwork puff right up when you place it in the microwave!
    3 ingredient puffy paint
    I love that Homemade puffy paint is a great art activity for children and has the added bonus of being a bit of a science experiment as well.
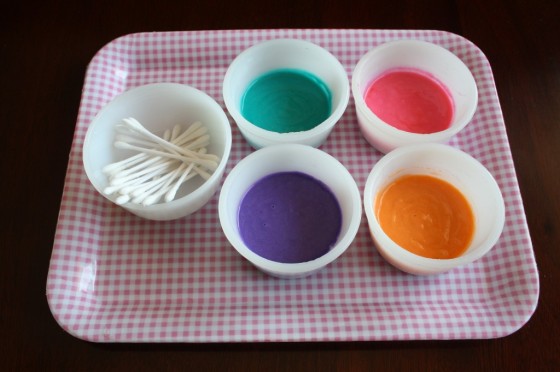
    homemade puffy paint - self rising flour, salt, water

    TO MAKE YOUR OWN HOMEMADE PUFFY PAINT, YOU’LL NEED:

      • 1 tbsp self-rising flour
      • food colouring in the colours of your choice (I used Wilton icing gels) see below
      • 1 tbsp salt
      • little bit of water (start with 1/4 tsp)


    Friday 9 January 2015

    Simple Homemade Tricks For Removing Crayon Marks From Walls


    If you have children, chances are at one time or another your little darling will play Picasso (or one of his/her friends will) on one of your nice light colored walls. Here are several simple ways to remove crayon marks from walls and other surfaces.

    Baking Soda: This one is by far the best on the list, it works remarkably well with very little effort. Wet a clean washcloth or cotton cloth and wring it out, dip the cloth in baking soda and rub gently to remove the crayon marks from painted walls. Wipe with a clean cloth to remove any leftover residue.

    Alcohol: Rubbing alcohol can mixed with water at a 1/3 ratio (1 pt alcohol/3 pts water), apply with a soft clean cloth to remove crayon marks from carpeting.

    WD40: Did the kids use your wall as if it was a big coloring book? Spray some WD-40 onto the marks and wipe with a clean rag. WD-40 will not damage the paint or most wallpaper (test fabric or other fancy wall coverings first). It will also remove marker and crayon marks from furniture and appliances.

    Toothpaste: Roll up your sleeves and grab a tube of non-gel toothpaste and a rag or—better yet—a scrub brush. Squirt the toothpaste on the wall and start scrubbing. The fine abrasive in the toothpaste will rub away the crayon every time. Rinse the wall with water.

    Mayonaise: Here’s a simple way to remove crayon from a painted wall that requires hardly any elbow grease: Simply rub some mayonnaise on the crayon marks and let it soak in for several minutes. Then wipe the surface clean with a damp cloth.

    Pencil EraserTry “erasing” the crayon marks to get the wall back to a clean slate.
    Steel Wool: Your toddler just created a work of crayon art on paper. Unfortunately, it’s on yourwallpaper. Use a bit of steel wool soap pad to just skim the surface, making strokes in one direction instead of scrubbing in a circle, and your wall will be a fresh “canvas” in no time.

    Soapy Water: Crayon marks on silverware or stainless steel surfaces will wash away easily with simple soap and water.


    Wednesday 7 January 2015

    Recycle Those Old T Shirts & Make Scarves Out Of Them


    From T-shirt to scarf


    In the winter I always try to add a touch of colour to my looks, because usually I use very dark colors. And what’s better than to put colour near the face to illuminate it?
    Create this fringe scarf from an old T-shirt. Recycle your summer T’s and give a boho-chic look to your outfit .You just need a pair of scissors!
    Materials:
    • T-shirt
    • Fabric scissors
    IMG_3994
    Process:
    1. Cut the T-shirt under the sleeves.
    IMG_3998
    2. Cut 20 cm fringes where you made the initial cut.
    3. When you have all the fringes, stretch down each one to elongate them.
    IMG_4008
    4. Join the fringes by twos and tie knots.
    IMG_4009
    5. Separate the tied fringes. Knot again by twos, this time with the fringe beside.
    IMG_4012

    This is your new scarf! Super easy to do and a good idea to recycle your old T’s.