Friday, 20 February 2015

Make Your Own WIne Rack - Usiong Old Can's Etc


Materials

Materials:
– 4–12 large coffee or tomato cans (depending on the size of rack you want to make)
– can opener
– 1 can white spray paint
– 3–4 cans brightly colored spray paint
– E6000 Glue
– cardboard or a drop cloth
– gloves (optional)


Instructions:1. Remove the labels and make sure the cans are completely clean and dry.
2. With a can opener remove the bottom of each can so they are open on both ends. (If there are any rough edges, file them down to protect your fingers.
3. Spray the insides of each can in a bright color. We chose to go with a range of blues and purples. Be sure to spray from both ends.
4. Once the insides are dry, spray the outsides of the cans white. We found that this took two coats to be fully covered.
5. After the cans are completely dry arrange them into groupings by horizontal row. Glue the cans together in a row, and secure with binder clips or clothespins while they dry. Repeat with the additional rows
6. Once the glue has dried, glue each row together and secure with binder clips. Allow this round of glue to dry fully before using.
Peel off can labels

These labels (thankfully!) were easy to remove since they were only glued in one stripe.
Removing bottoms

Remove the bottom of the can, and the inner ring around the top if your can has one. This will allow you to slide the bottles in evenly and make sure everything is balanced.
Spray the interiors

We chose to do a blue and purple color palette, and since we had four shades we did three cans in each color. Because the interiors are ridged, spray first from one end, then flip the can over and spray again from the other side.
Spray the exterior of the cans

We found that it took two coats to cover the cans evenly. Just allow enough drying time between coats. Once again, it helps to flip the can over halfway through.
Arrange the colors

We grouped our four colors into rows of three making sure not to repeat a color combination twice.
Glue the cans into rows

Glue your rows together and give the glue time to dry. Securing the cans with binder clips or clothespins will make sure nothing shifts.
Glue the rows together

Finally, start gluing your rows together. You’ll need to stack the cans and mark where to put the glue.
DIY Color Block Wine Rack

Now all that’s left is to add some wine!


Wednesday, 18 February 2015

Making Your Very Own Snuggle Bundle


I wanted to make something toasty and snuggly and protective. A beer cozy, but for babies. A Baby Cozy.


Materials:

US 10.5 24-in. circular. US 11 dpns.
2 skeins Knit Picks Wool of the Andes Bulky
Tapestry needle
stitch markers
4 size 18mm buttons
1 size 20mm button

Gauge:

For snuggle: 18 sts and 20 rows = 4 inches.

For hat: 12 sts and 16 rows = 4 inches.

Snuggle Pattern:

Using circular needle, CO 32 sts. Work 2 rows in garter stitch.

K2, yo, k2, *m1, k2. Repeat from * to end. (47 sts).

Knit 5 rows.

K2, yo, k4, m1, *k3, m1. Repeat from * to last 2 sts, end k2. (62 sts).

Knit 5 rows.

K2, yo, k6, m1, *k4, m1. Repeat from * to last 2 sts, end k2. (77 sts).

Knit 5 rows.

K2, yo, k8, m1, *k5, m1. Repeat from * to last 2 sts, end k2. (92 sts).

Knit 3 rows.

BO 5 sts at the beginning of the next row, knit to end. Do not turn.

Join to begin working in the round. Place marker for round at center back. Work in stockinette until piece measures 17 inches. Work 4 more inches in garter stitch.

Work 2tog, work 21 sts, place marker, work 43 sts, place marker.

Sew together all sts between markers using kitchener stitch (if you have to fudge and move stitches around the markers a little, it's okay--the idea is just to have the snuggle lie flat). Weave in ends. Sew smaller buttons opposite buttonholes; they will move increasingly away from the edge.

                       
Hat Pattern:

Using dpns, CO 4 sts. Work i-cord for one inch. Divide sts onto 4 needles, k f&b into every stitch (8 sts).

Knit 1 rnd.

K f&b into every stitch (16 sts).

*Knit 1 rnd.
(Knit to end of needle, m1 in space between needles) around.

Repeat from * until there are 48 sts.

Work even for 1 inch.

CO 4 sts. Purl 1 row. Turn. Do not join. Purl 1 row.

Next row: p2, yo, p2tog, purl to end.

Work in garter stitch until garter section measures 1 inch. BO loosely.

Weave in ends. Sew larger button opposite buttonhole.

Monday, 16 February 2015

Home Made Cereal Bars


Make your own simple cereal yogurt bars for a quick breakfast or midday snack. These easy bars are great for Back to School or after school snacks as well!
This versatile recipe can be easily changed for multiple variations, include 1/4 cup of finely diced dried fruit or berries.

You'll Need:

2 cups Cereal of your choice such as raisin bran, honey almond flakes, corn flakes etc
3/4 cup flour
1/4 cup firmly packed brown sugar
1/2 tsp. ground cinnamon
1/2 cup (1 stick) butter
1 individual container (8 oz.) Strawberry Yogurt (Or Blueberry, Peach, Vanilla, etc)
1 egg, slightly beaten
2 Tbsp. flour

In a medium bowl combine cereal, (3/4c) flour, brown sugar and cinnamon, stirring lightly to mix the ingredients together.

Cut in the butter until mixture resembles coarse crumbs. Press 1/2 of the mixture firmly onto bottom of greased 8-inch square baking pan.

MIX yogurt, egg and 2 Tbsp. flour until well blended; spread it evenly over the cereal bars, then Sprinkle with remaining cereal mixture and press together.

BAKE at 350F for 30 minutes or until golden brown. Cool in pan on wire rack.

Cut into 16 bars.

Note: When baking in a glass baking dish instead of a metal pan, bake as directed reducing oven temperature to 325F

Friday, 13 February 2015

Making Your Very Own Picnic Caddy Out Of Old Cans


1- Get 6 cans without lids and sand it to remove any burrs left over que May Have When cutting the cover. Tip: Prefer taller cans of the cans of peeled tomatoes. 

2-Paint cans inside and outside. Use the color you like and let it dry for one day. We used synthetic enamel paint. The synthetic enamel protects metal against moisture, Preventing rust. You can use any other paint que goes with metal. 
Tip: Insert your hand into the can and spin the can while you brush it outside. Put the can on the table lined with newspaper and brush inside. Alternatively, wait for the paint to dry outside to paint inside. 

3 Choose a piece of wood and paint with synthetic enamel paint or other. Here we put the little white ink on the paint we used to paint the cans are tones are different. The wood is a little lighter than the cans. If you like the original color of the wood and cans, you do not need painting anything. 

4- With a thick nail and a hammer, drill a hole in the can for threading the screw. 
Tip: To make this step easier see the picture and see how I put the can inside a thick piece of wood que was holded by the red clip. So the can Stood firm to hammer. Is not scratching the paint, put a piece of felt between the wood and the painted can. 

5- Place the cans stuck in place que will be screwed.Mark the location of the hole in the wood with a pen or pencil 

6 Drill the holes 6 in wood using a hammer and nail.

7- Place screws into the holes of a can, Then screw it on the wood piece. Repeat with all the cans. 

8. Screw the handle after making the hole with nail and hammer. 

Monday, 9 February 2015

Yummy Potato Pancakes - Easy To Make


Potato Pancakes (Latkes)
by Michelle Jones, Founder @BetterBudgeting

Category: Recipes, Frugal, Side Dishes, Potatoes

Prep Time: 30 minutes 
Yield: 12-14 (about 4 servings)

Our search for perfect potato pancakes is finally over. And it only took 30 years. A little tweaking here and there, and what do you have? Absolute deliciousness. I could eat these for dinner, with nothing else. Every night. For the rest of my life. Yes, they are that good! 


For a light and frugal dinner, serve them as the main dish with a side of turkey sausage (as pictured above).

Potato pancakes, also called Latkes, are traditionally served during Hanukkah. They are easy to make and very budget friendly. 


Ingredients:

6 medium potatoes, or 4 large

2 large eggs, lightly beaten
1/2 c. all-purpose flour
1/2 sweet onion, medium to large, diced
1 tsp. sea salt
Cracked black pepper, dash
Vegetable shortening (Crisco) 

Serve toppings separately on the side... applesauce, sour cream with fresh chives, and/or maple syrup or agave


Directions: 


Peel and shred potatoes. Using a clean dish cloth, cheese cloth, or a few paper towels, wrap shredded potatoes in center and (holding over a bowl or the kitchen sink), squeeze as much liquid out as you can. 


Place about 1/2 inch of oil in iron skillet and heat on medium. While oil is heating, combine potatoes and remaining ingredients in a large bowl. Using a 1/4 cup measure, drop potato pancake mixture into skillet and press with spatula to flatten. 


potato pancakes, latkes, cooked in oil

Depending on the size of your skillet, you can cook 3-5 pancakes at a time. Brown on both sides (about 3-4 minutes each), then place on serving plate lined with paper towels. 

Serve about 3 potato pancakes per person, with toppings on the side. Our favorites are applesauce, sour cream and fresh chopped chives, maple syrup, or, all of the above. 

Friday, 6 February 2015

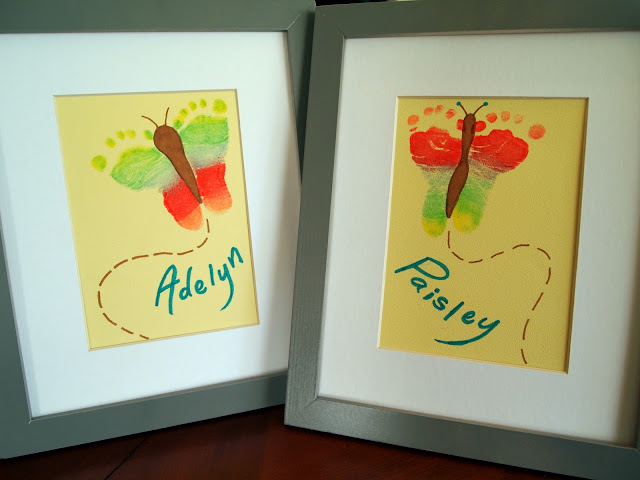
Rainbow Butterfly Footprint Artwork

Rainbow Butterfly Footprint Artwork

This is copies from another website:


So my sis-in-law Kelly gave me a great idea for  a craft to do with the babes! I’m always looking for fun cute things to do with the girls (even though they’re babies!). I love footprint crafts because it’s a great way to make artwork that’s sentimental  yet still involves the little one!
We started out by whipping out a little rainbowy stamp pad and some card stock.
NOTE! Rainbow stamp pad is non-toxic, safe for baby’s skin, and can be purchased here.
Then I just pressed the stamp pad on their little tootsies! After getting them all inked up, I held their ankle still for a few seconds to wait for them to stop wiggling before I pressed that chubby foot onto the card stock!
And then I just used a couple markers to draw in the body of the butterfly, antennas, and the girls’ names!
And I pulled out some cheap unused picture frames, and spray painted them gray with some leftover Krylon.
Cute, right? I can’t decide if I’ll put them on that long shelf in the nursery, or hang them on the living room wall for awhile!

Wednesday, 4 February 2015

Easy To Make Cracked Heel Relief


Cracked Heels keeping you from wearing your favorite sandals? Here's a relatively simple, quick fix.

You'll Need:

Rice (Plain white or brown)
Raw Honey
Apple Cider Vinegar
Olive Oil (or coconut oil)


Grind a handful of rice into a fine or slightly semi-coarse flour. We used the blender to grind ours, (pulse!) If you try to grind it too fine it'll clog your blender.. Add a Tablespoon (or 2) of RAW honey to the mixture along with just enough apple cider vinegar to obtain a thick paste.


If the cracks are very deep, add a spoonful of olive or coconut oil. 


Soak feet in very warm water for about 20 minutes. Then apply the paste liberally to the affected areas, gently massage the heals with paste. If you have a pumice stone, gently rub the heel to break up the dead skin and slough it off. Rinse with warm water.


Repeat daily for 3-5 days to see a massive improvement. Application of coconut oil in between treatments will help keep the heels soft and supple as well.


It is important to use RAW Honey which is unheated, unpasteurized, unprocessed honey.